Wednesday, December 29, 2010

A Round of Jenga Anyone?!

It came to me the Sunday before Christmas. 6am. 

My parents are the kind of parents who have what the need and answer the question, "What do you want for Christmas?" with "Oh you being here is enough!" Right which equals absolutely no help on what to get them for Christmas because you and I both know you can't not get them something!

Back to that sudden wake up epiphany....they like to have fun! I KNOW they love the GIANT Jenga set at the bar in downtown Bend. Duh Melissa...you can make that!!

Then started the math calculations.
54 pieces. Measure the width of 3 pieces...I'll need that to be the length of the boards in order for them to be perfectly square for setup. Normal Jenga is 18 pieces high, yep that's right.

Hello nice Home Depot Employee I'll take 7-8 foot 2'x4's.  And UMMMM can you cut those in about 1 foot sections for me?! THANKS! haha Good thing it was a slow Sunday and they were bored anyhow! PLUS they thought the idea was genius! Yeah us to! Thanks to Kurt for being just as excited about it as me! (Men like going to Home Improvement stores with their girlfriends--it's way better than the mall!) Together we figured out all the math and what supplies we needed. So fun :)

Turns out the boards were a tad too long but eh it works. Oh and I forgot to mention that I went back and asked for another set to total 3 Jenga sets in all-a whopping 162 pieces of 10.5" 2"x4"s :) The same guy helped me--those were too long too--OH WELL! I didn't have to cut them--THANK You HOME DEPOT and your Friendly staff!

Kurt built a 2 sided Jenga holder with a bottom--we're workin on making this concept better-it's super great to look at, but WAY heavy to carry-stay tuned.

I painted Jenga down the side of it and gathered together about 12 pieces. I wrote on the pieces things like "reverse" "Take another Piece" "Wild Piece- skip a turn, make another player pull two, or continue play as usual""Tell a joke" "Busta Rhyme" --I always pulled "Pull another Piece"

For my cousins set I left all the blocks blank so the boys and Jenn could design their own Jenga set! Hand painted blocks Jenn--Make it happen!

The gift was a hit!


P.S. Watch your head...they tend to fall quickly!

<3 ZZB

Monday, December 27, 2010

Merry Merry Scarves!

Oh goodness, I've been slacking! No really I haven't been slacking at all. I have been BuSy! Right, right everyone's been busy, its the holidays! No excuses.

The big excuse is: All my creativity has gone towards Christmas gifts. So now I can finally do a post without ruining surprises!

All the women in my life got this Scarf with a ~Zb TwIsT~ BUT bad news, I made about 10 of them and have very few photos to prove it. I get so excited to give something that I have made and totally blank on taking pictures of the final product. {New Years Resolution-Be better at this!}

The Made Summer Scarf linked above is one ruffley, bouncey, fun Scarf. To make her scarf {my own} I doubled it! Two scarfs in one wait no 3 scarves. This is 2 scarves-- a more wintery fabric, plaid or just a thicker option. And then for the top scarf a complimentary, light, flowey fabric.  
I then made each scarf, which sidenote---MADE's pattern uses elastic thread...hahahaha..right. That was a giant FAIL for me!! I started these in November and ended up doing them all the week before Christmas! Elastic messed my machine up. So MADE does show an option if the elastic doesn't work out. Sew single lines x2 down the middle and then start gathering. Warning: This takes a lil while and makes your fingers red and tender...maybe you can figure out a better option-or better yet plan to do one at a time :)!  The MADE tutorial then tells you to sew a strip over the top of your gathering, for aesthetics and time I skipped this step. My friends and family are perfectly capable of adjusting the gather if it moves around :)
Anyhow, I made the two scarves and then sewed three button holes in the light weight fun flowey fabric, one in the middle and then about half way down each side. I then paired up the scarves and figured out where to place my buttons.

Button them together a volah!

Three Options:
1. Wear the winter one all alone.
2. Wear the summery one all alone.
3. Wear them buttoned together! Oh and change up how you button them for another look!

These really jazz up a solid colored tee or long sleeve!


Thank you MADE for your initial Tutorial. Hopefully I can coax all the ladies into doing a photo shoot with their scarves! Stay Tuned!

Happy Scarving!

~ZB

Monday, November 22, 2010

Trip to Canada

Hello-

I've been off on a big adventure with Kurt and Coop, so creations were put on the back burner {But don't worry it inspired even more}!

Friday morning the boys and I loaded up--Canada bound!

Our plan-Spend as little as possible and have a great time...

Details on how we would accomplish this- I've always wanted to camp in my Subaru since the sun roof is so huge, so air mattress in the back, gear in the front seats. I precooked fajitas and made pasta salad, cans of soup, veggies, tea and oatmeal. Then snackie stuff. Perfect no money will need to be spent on lodging or food----right?! In theory.


Did it work?! YES!

We headed north, picked up Cooper's coat {Temps were predicted in the teens for night time} from Auntie Laura in Mount Vernon and made our way to the border crossing. The crossing lady was not impressed with us. "Why do you have so much stuff for 2 days?" "We're camping." "Up here?!" Yes mam we like adventures. On we went. We planned to miss Portland, Seattle and border traffic which landed us in Vancouver traffic. Oops missed that part.

Took a detour into Stanley park-somewhat accidentally, but none the less we had heard it was pretty. First shot of Canadian wildlife, a skunk. We then had a nice chit chat with Coop about staying away from the animals-they aren't his friend, even though he wants them to be. Could you imagine being trapped in the car for 20 hours with a skunk covered dog!? Would not have been good! We ventured the wrong way on a one way road--oops. That could have been avoided had navigator spoke up-my bad. Since traffic was horrendous down below we stopped at Stanley park Teahouse for a glass of wine. Turns out they had a lounge with a fire place and a very friendly staff that filled us in on where we should head in search of some camping. They prolly thought we were crazy! Coop and Kurt played frisbee for a bit and we were back in the car.
 
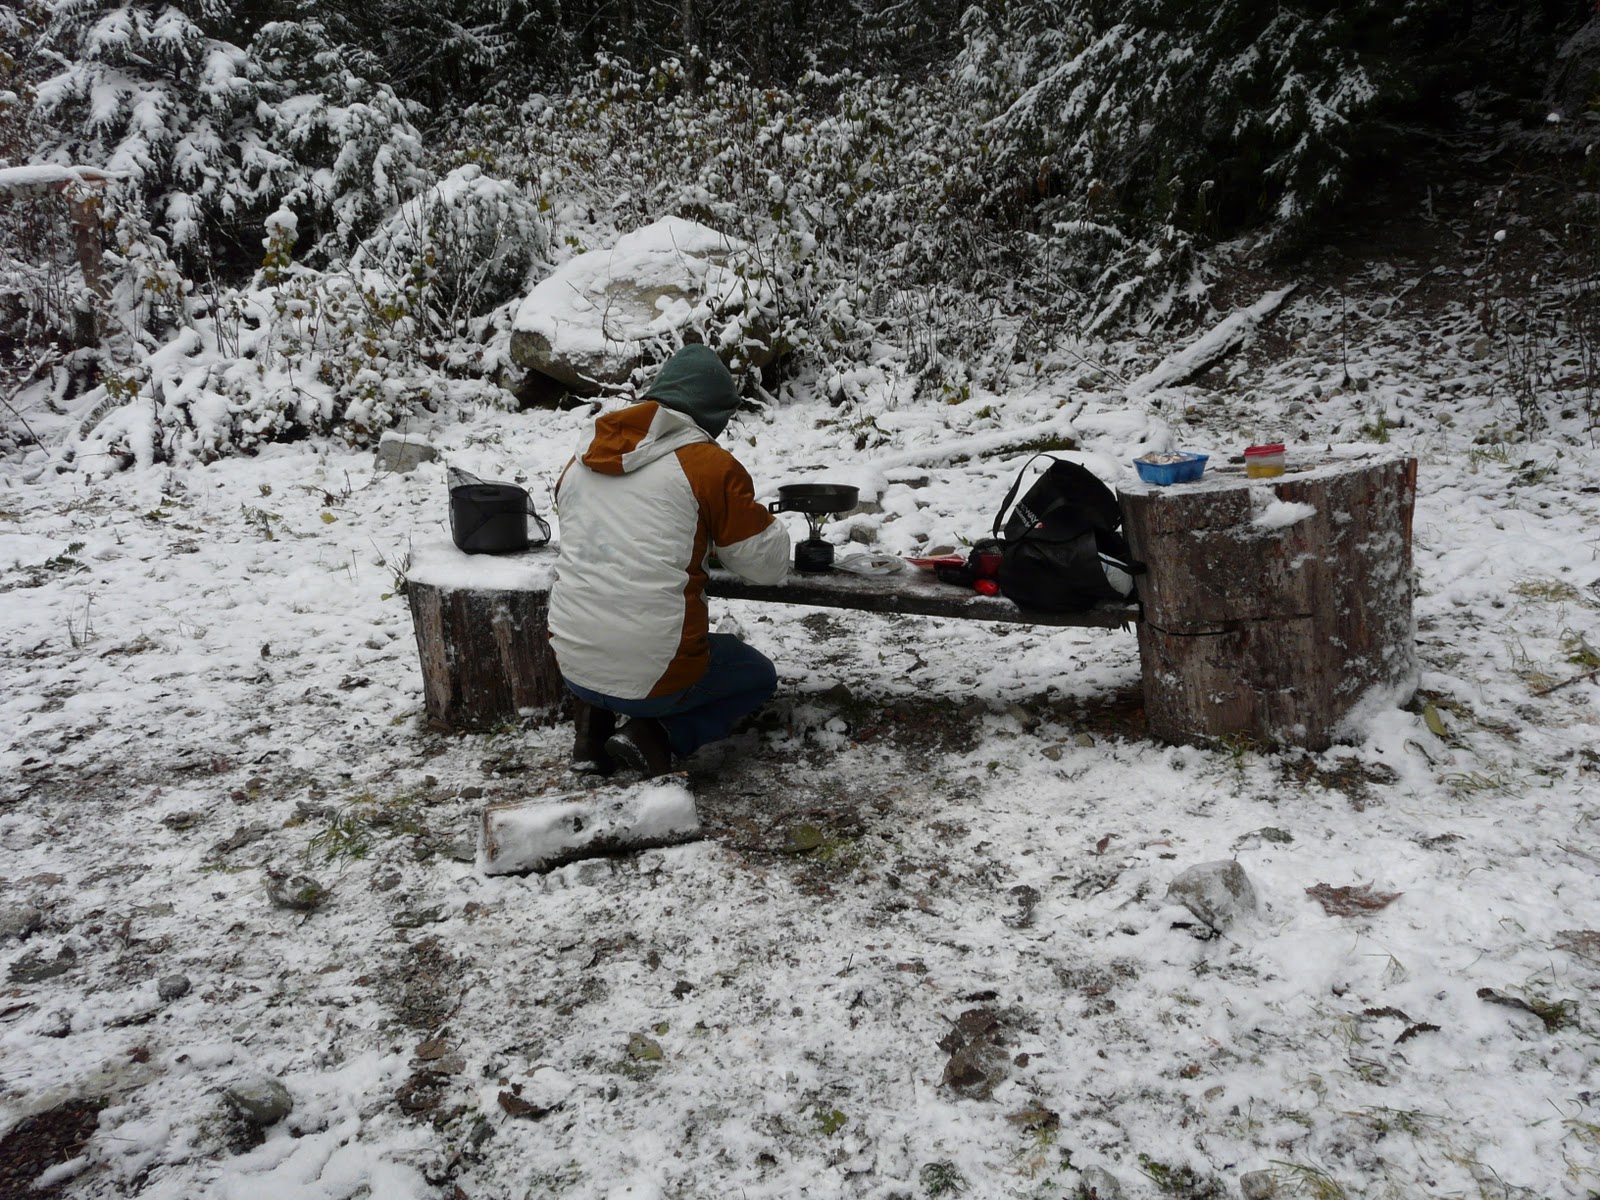
We drove and drove and drove toward Whistler--I forgot to mention that Coop gets car sick so he now has to sit in my lap while we drive so he doesn't get sick--he did one fake out while going 70mph before Seattle, but made it the whole trip with no pukin! yeah! We pulled off the road several times in hunt of the perfect spot but were denied but gates or camping/dogs prohibited. Dang it Canada! We thought this would be easy! We finally went several miles up a dirt/gravel road just to find the area closed due to bears. "Hmm I wonder when that sign was put up?" Let's do it. If we go high enough it'll be too cold for bears. {Fingers crossed} My dream spot was one that was in an opening looking at the mountains---Let me tell you Kurt delivered! Not only did we wake up to a balmy 17 degrees and 6 inches of new snow on the car but a view to die for>>>the Whistler mountain range! Gorgeous!


We realized that we brought the 2 burner stove, but forgot the gas. Good thing we had Kurt's single burner. We cooked all meals on it--worked like a charm! Also cooked with the wine opener because we forgot utensils haha. It worked! On our way down, straight down, Kurt was saying "Umm Mr. Mangin, your daughter is fine just a few broken bones, but the car uh...." Lol he did great, but I will be adding chains to our adventure stock! We were stopped by a little car on the way out-turns out the guy had lived in Oregon--Lake Oswego, Or RANDOM! Such a small world.


We spent the day wandering around Olympic park and Whistler. Enjoyed a warm drink in Whistler village. Coop played with some other pups at the dog area. I didn't make him wear his boots and coats-he didn't seem to mind, but my lap did when he got back in the car covered in snow clumps {Next Coat- Puffier so he doesn't look so skinny, while wearing it! Also the pleather doesn't cut it in the snow be cause it cracks so the theory for the booties worked fantastic we just need a new fabric!} At the grocery store we picked up some utensils and asked for some ideas of where to camp. Great! They were excited to help us out and we were excited we would be all set up before dark and maybe get a hike in.

Wrong a closed gate yet again. Closed gate after closed gate, made it well after dark by the time we got settled. We were also starving. We enjoyed sausages, broccoli and green beans for dinner with a glass of wine sipped from our nalgene bottle. Coop stayed close by but loved the snow once again. We decided to not blow up the mattress for awhile so we could play cards. I got my butt kicked at Rummy and we rocked out to some great tunes-thanks DJ Kurt. Also played a little ishoot on the ipod. We looked at the clock at 8, laughed and warned Coop that he better sleep for 12 hours! He did, on top of me which meant I slept terrible! plus it felt WAY colder than the night before-hmm.

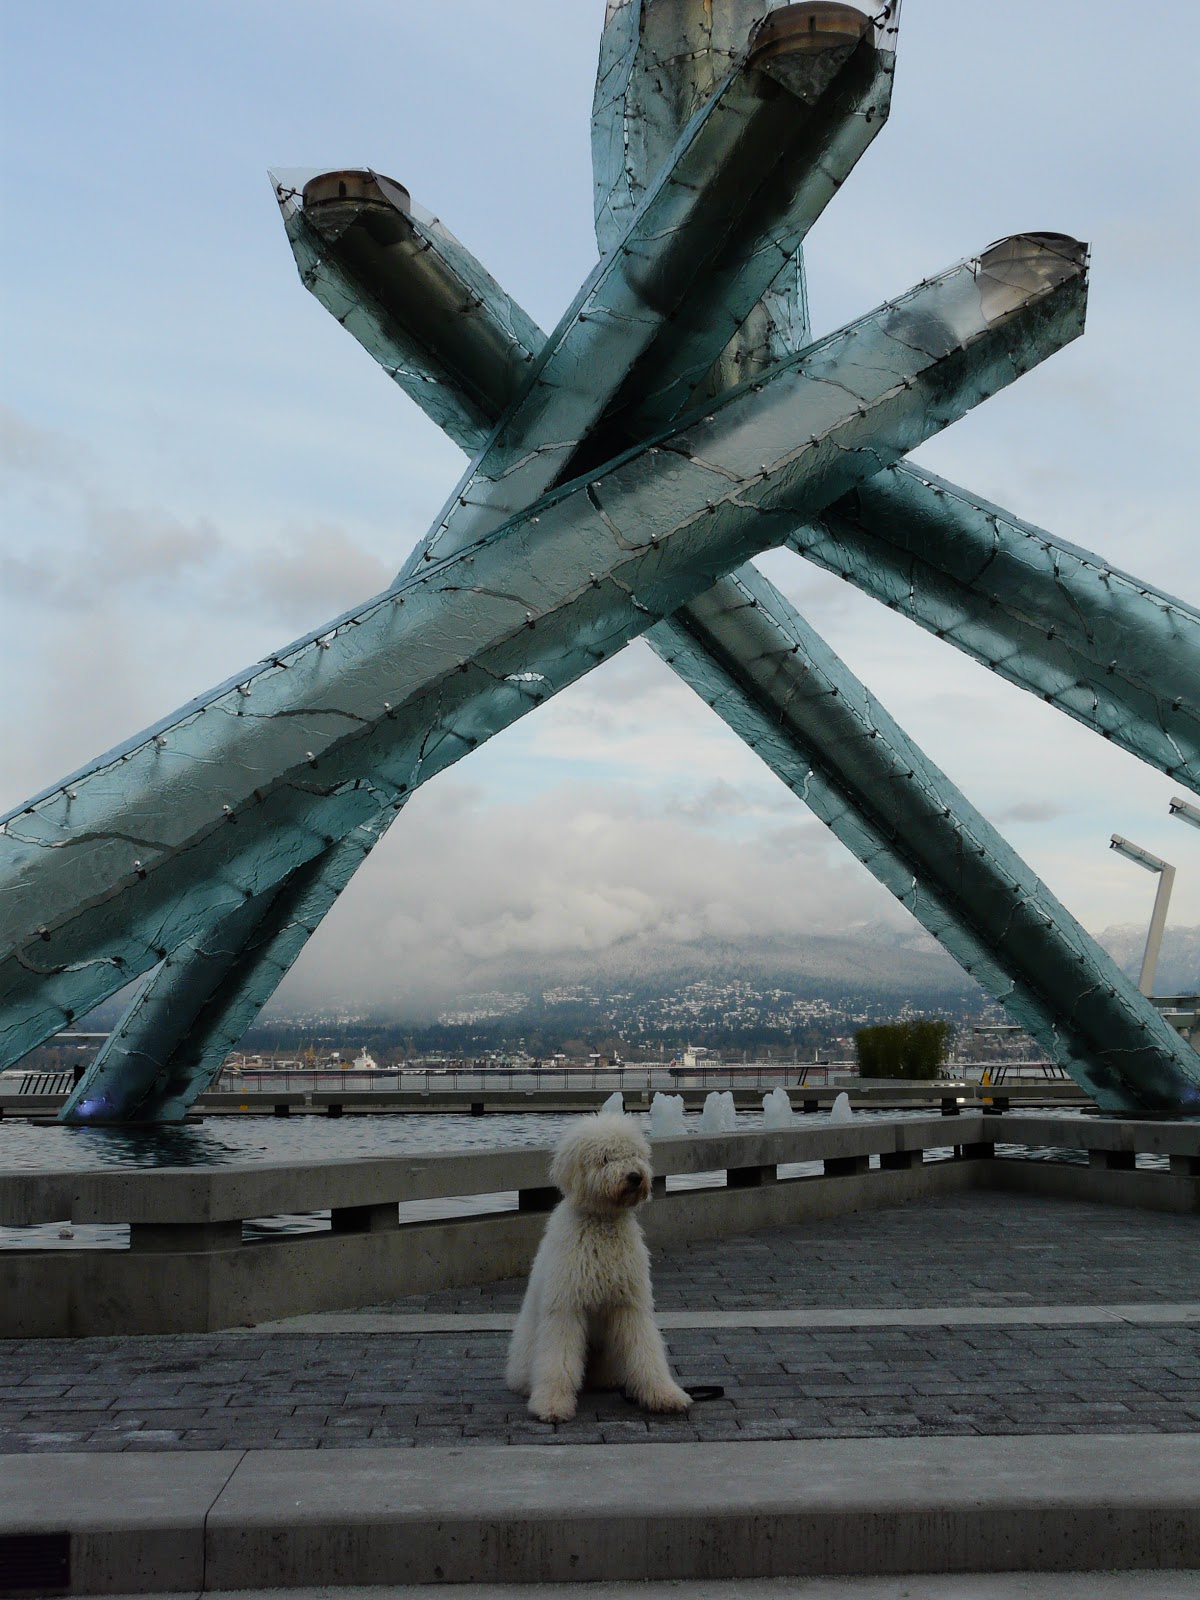
After breakfast and packing up we made our way to downtown Vancouver to wander around. We walked to the waterfront and saw the Olympic torch. The walk was beautiful, lots of very nice people happy to answer the tons of questions we had come up with about the Vancouver area. The lights blink green because its a pedestrian light-huh cool! And the entire water front and the road to Whistler were redone for the Olympics. Cooper was exhausted by the time we got in the car.

All in all we had a fantastic adventure! Added several would have could have should haves to our list, but really had we crossed our t's and dotted our i's the adventure wouldn't have been quite as adventurous!

--We successfully never ate out and slept in the car! All in all we only spent money on gas, coffee, and wine!--

--ZZB

Wednesday, November 17, 2010

Muddy Paws...Solved!

So here's the situation. 
Coop and the mud and my carpet {I want my deposit back} and his white paws. You do the math...it's not a pretty {or clean} situation. 

Booties! Yes he should have some! Online and in pet stores= spendy!! Using left over pleather and fleece from his rain coat I made him=a fantastic money saving option {hear that dad ;)}.

For all of you thinking this is a fashion thing... it is not it's a practicality thing! ;) Cuz really, you'll see, they look pretty silly!

TUTORIAL comin' atcha!

1. Pick out whatever fabric you would like- you need about half a yard for a Coop sized {40lbs} dog. If you are making them for outside I recommend something durable and waterproof--I used pleather and lined it with fleece {leftovers} for this first pair, we'll see how it holds up. 
Paws Ready for Booties
 2. Fold your fabric in half, make a vase-like shape with pen on the wrong side of the fabric, put the bottom of the "vase" at the fold in the fabric and cut it out.
 3. It'll look like this after its cut out. I used the first one to trace it onto the next one and so on.

He loves them already!
 4. Check to be sure their paw will fit. When you squeeze his fluff this size works great! I did about 6-8" tall and 5" wide. Remember seam allowances.
 5. Cut a strip of your fabric or whatever scrap you have. I thought about the fleece for contrast, but it stretched too much. Sew a 1.5" piece of velcro fluffy side up on the wrong side. Flip it over and sew the rough side of the velcro to the opposite end of the velcro. {Note: It doesn't work if you sew them on the same side, but it doesn't really matter which side rough vs. soft the velcro is on.}

 6. Before you sew the boot together put the strip across the neck of the "vase," Just either one layer or two if you lined it.

I just did two side by side stiches in red so it's no big deal if they don't look fantastic. I went back and forth 3 times for strength.
 7. Hook the velcro, so it doesn't get stuck in your stitching .
 8. Fold it in half, so it looks like you had it when you originally cut it out. Make sure right sides are together. Sew up the edges, leaving the top open-for the paw :) {I back stitched at the top and bottom an inch or so for strength. The top doesn't always line up perfect, but I didn't really obsess over that part.}
 9. Flip the booty right side out and there you go! Strap them on their paws!
Coop asleep on my work surface with his booties on.

They look silly, but they wipe right off when he comes inside!

If you flip down the top the lining shows through and his legs don't look so skinny. So didn't get a photo of that.

I need to add a nonslip surface to the bottom of them cuz he slides around a bit on the carpet, but outside he doesn't slide.
Some things I would change for the next pair. 
      1. Sew on a nonslip circle of material where the paw pad will go. Do this when you sew on the strap.
      2. Sew the lining and exterior together on both ends so they are easier to put on. Do this also when you sew on the strap.

Recommendation: Make one and make sure it fits before you do four :) {I saved myself a lot of time because I cut one out and then realized it was too small.} Also make sure its not too small/tight because this could injure the paw pad.


Have fun and its ok to laugh because he looks silly--I know--wait til I put his raincoat on too! He keeps them on great! Good pup!

Hope you enjoyed the tutorial :)

--ZZB

Sunday, November 14, 2010

Today!

It is gross outside....poor Coops he prolly wants a walk and to be honest CrEaTiNg something sounds way better.  He and I will play fetch in the apartment--Good idea Aoife!


So what will I do today.... prep a cute fabric clutch-->inspiration and begin some Christmas Gift tags-->inspiration the new Patagonia Catalog!

Stay tuned for pics!

--ZZB

Friday, November 12, 2010

Fun UnIqUe Fall Decor

Last weekend I made the trek over the mountains and through the woods to my mom and dads. I really should find a dentist on this side of the mountains, but it's a good excuse to go see my family. They're kinda fun!

Mom decided a girl's night at the house would be fun {a relaxing retreat from every day life} and some great women gettin together! Mom and I decided on a wreath theme and headed to JoAnn's, the $1 Tree, and Michael's. By the time we arrived home the dining room table looked like this!
Fabric quarters, burlap, tulle, raffia, ribbon, flower bunches, leaves, spray paint, glue...

 My unconventional re-purpose wreath-the base is an old picture frame wrapped in burlap
 Added some fabric rosette flowers, flowers, burlap, pine cones and buttons
Mom #2's wreath! Love it Cath! Started as a round metal wreath that she wrapped in burlap and added floral to
The beginning of Karen's ambitious wreath. A styrofoam base wrapped in burlap. Then fabric squares were poked into it! It turned out fabulous!
I had an extra frame and some extra time so i whipped this up for my living room. Green is my accent color, it works perfect!
Hillary's fun frame wreath :) She wrapped her frame in a purple plaid fabric and then added goodies around the sides.

Didn't get photo's of Lisa's fun wreath it was a metal circle wrapped in tulle and ribbon filled full with fall florals! Loved it!

Mom did a fall floral arrangement in a basket--missed the pic! Thank you for getting us all together and thinking up a great Sunday night! Made coming home for  the dentist worth it! I love you! <3

Gather your gals together, throw some fun fall or winter decor on the table and enjoy creating with great company {Does the mind and body wonders!}
--ZZB

Thursday, November 11, 2010

Corks!

Kurt and I like a yummy glass of wine to relax after a day on our feet. Corks are fun--Hmmmm what could I do with those, but it would take forever to get enough corks for something fun. 

BUT wait! I found a HUGE bag of corks in Kurt and Andrew's pantry---YES! So I stole them when they left for camping one weekend this summer. 

Look what I came up with!

A Side Table for Me! {Started as a dinner tray from target, found the molding in the free section at the local lumbar yard}

A Corkboard for Andrew and Kurt-Thanks for the corks guys! Keep em comin! 

For the record I didn't even dent their collection. The guys have dated some of the corks to remember fun get togethers--I didn't steal these ones, but am plannin up some sort of memory project for those ones!


Need a tutorial on this one! Let me know!!

--ZZB

Repurposing Clearance Summer Dresses and Tanks

Good Morning All!
       
      Here's to quick projects on the cheap! I frequent the clearance racks at Target, Macy's, Old Navy...well where ever I may be. {Check out this apron to the right.} It used to be a tank top that was just too "flowey" for my liking. Keep in mind before this apron I have never made an apron or tried to re-purpose any other piece of clothing. With my new summer attitude of I can do anything {ok who are we kidding, all it takes for me to try is for someone to say I can't or won't do it} Scuba Diving- check! Wiring my own car stereo- check! But this past summer it was me pushing myself to try new adventures with my creativity and my sewing machine. I was given my machine by my grandmother 12-13 years ago-who is an amazing quilter. She's the recipient of my emergency calls from JoAnn's, "How many yards do I need for a quilt?!" or the "Gram, how do I use elastic thread?!" She always says, you practiced on other fabric right?! No of course not I wanna get this goin! Thank God for Gram and her patience with my calls :) 

      Ok sorry back to apron making! {Here's how simple it was!} Cut off the back of the tankand snip the straps where they meet the back-you will use these straps as a halter top now. For this one I wanted a little bunching at the waist so I cut the tank where I wanted the bunch and hand stiched it back on and hand gathered it. I sewed the back of the tank to the bottom of the front of the tank. Created a tie and belt loops from the left over fabric, added them over the top of my gather and Tada--an apron!

     The aprons to follow were clearance dresses found at Macy's for an absolute bargain! I cut the backs off and sewed down the sides with a fun zigzag stitch in a fun color thread. Some of the dresses had waist ties others I had to make my own. I used the original straps and turned them into halter ties. 


WARNING: Once I bought these dresses with aprons in mind I tried to wear one just for fun before I cut it up. Nope couldn't do it! I felt like I had to stay in the kitchen allday!


I'd be happy to do a tutorial on this one if anyone is interested!

--ZZB

Wednesday, November 10, 2010

Coffee Table

The summer between Junior year and Senior year of nursing school Up nurses complete a summer school session. Mine was maternity so I was happy to stay for the summer. The house we lived in had a huge backyard, which meant lots of room for CrEaTiNg!

Often times when I was bored {not wanting to study} I would make my way to the ReBuild It center on Mississippi St and wander around. See where my creative juices would land. This particular day I was prolly there for hours just pondering what fun thing I could create. I was in a table kind of mood having just completed our living room coffee table. {It was chickens.} Chickens decoupaged all over it :) No I don't have a love for chickens it just looked fun!

Well this is what I left the ReBuild It center with.

An Old Church Pew Shelf

An Old Window

Two Side Tables


With the side tables and window I spent $30, add some paint $5. Now get to work! I painted the tables white to somewhat match the window, but I left the window unpainted to leave the natural, repurposed feel. To create a coffee table type feel I sawed out the back panel just down to the shelf. This would allow me to display books or whatever I felt like showin off under neath the window. I then screwed the two tables back to back once the paint was dry. Popped on the window with a few screws and viola a Coffee Table!! I did add a a sheet of plexyglass to the top so it would be a flat surface, however plexyglass scratches really easy. Someday I will find the perfect piece of glass to go on it!


Hopefully you're inspired to go repurpose! More re-purposing next!

-ZZB


Oh I forgot to tell yea! I also got the wood in the picture with the window for $1 a piece and made a frame out of it. I framed a rectangular portion of my bedroom wall and painted the inside with chalkboard paint. =Awesome To Do list!!