Wednesday, December 29, 2010

A Round of Jenga Anyone?!

It came to me the Sunday before Christmas. 6am. 

My parents are the kind of parents who have what the need and answer the question, "What do you want for Christmas?" with "Oh you being here is enough!" Right which equals absolutely no help on what to get them for Christmas because you and I both know you can't not get them something!

Back to that sudden wake up epiphany....they like to have fun! I KNOW they love the GIANT Jenga set at the bar in downtown Bend. Duh Melissa...you can make that!!

Then started the math calculations.
54 pieces. Measure the width of 3 pieces...I'll need that to be the length of the boards in order for them to be perfectly square for setup. Normal Jenga is 18 pieces high, yep that's right.

Hello nice Home Depot Employee I'll take 7-8 foot 2'x4's.  And UMMMM can you cut those in about 1 foot sections for me?! THANKS! haha Good thing it was a slow Sunday and they were bored anyhow! PLUS they thought the idea was genius! Yeah us to! Thanks to Kurt for being just as excited about it as me! (Men like going to Home Improvement stores with their girlfriends--it's way better than the mall!) Together we figured out all the math and what supplies we needed. So fun :)

Turns out the boards were a tad too long but eh it works. Oh and I forgot to mention that I went back and asked for another set to total 3 Jenga sets in all-a whopping 162 pieces of 10.5" 2"x4"s :) The same guy helped me--those were too long too--OH WELL! I didn't have to cut them--THANK You HOME DEPOT and your Friendly staff!

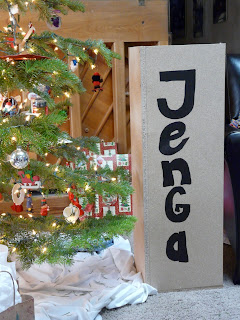
Kurt built a 2 sided Jenga holder with a bottom--we're workin on making this concept better-it's super great to look at, but WAY heavy to carry-stay tuned.

I painted Jenga down the side of it and gathered together about 12 pieces. I wrote on the pieces things like "reverse" "Take another Piece" "Wild Piece- skip a turn, make another player pull two, or continue play as usual""Tell a joke" "Busta Rhyme" --I always pulled "Pull another Piece"

For my cousins set I left all the blocks blank so the boys and Jenn could design their own Jenga set! Hand painted blocks Jenn--Make it happen!

The gift was a hit!


P.S. Watch your head...they tend to fall quickly!

<3 ZZB

Monday, December 27, 2010

Merry Merry Scarves!

Oh goodness, I've been slacking! No really I haven't been slacking at all. I have been BuSy! Right, right everyone's been busy, its the holidays! No excuses.

The big excuse is: All my creativity has gone towards Christmas gifts. So now I can finally do a post without ruining surprises!

All the women in my life got this Scarf with a ~Zb TwIsT~ BUT bad news, I made about 10 of them and have very few photos to prove it. I get so excited to give something that I have made and totally blank on taking pictures of the final product. {New Years Resolution-Be better at this!}

The Made Summer Scarf linked above is one ruffley, bouncey, fun Scarf. To make her scarf {my own} I doubled it! Two scarfs in one wait no 3 scarves. This is 2 scarves-- a more wintery fabric, plaid or just a thicker option. And then for the top scarf a complimentary, light, flowey fabric.  
I then made each scarf, which sidenote---MADE's pattern uses elastic thread...hahahaha..right. That was a giant FAIL for me!! I started these in November and ended up doing them all the week before Christmas! Elastic messed my machine up. So MADE does show an option if the elastic doesn't work out. Sew single lines x2 down the middle and then start gathering. Warning: This takes a lil while and makes your fingers red and tender...maybe you can figure out a better option-or better yet plan to do one at a time :)!  The MADE tutorial then tells you to sew a strip over the top of your gathering, for aesthetics and time I skipped this step. My friends and family are perfectly capable of adjusting the gather if it moves around :)
Anyhow, I made the two scarves and then sewed three button holes in the light weight fun flowey fabric, one in the middle and then about half way down each side. I then paired up the scarves and figured out where to place my buttons.

Button them together a volah!

Three Options:
1. Wear the winter one all alone.
2. Wear the summery one all alone.
3. Wear them buttoned together! Oh and change up how you button them for another look!

These really jazz up a solid colored tee or long sleeve!


Thank you MADE for your initial Tutorial. Hopefully I can coax all the ladies into doing a photo shoot with their scarves! Stay Tuned!

Happy Scarving!

~ZB